I have been considering enhancing my bike trail pages with some camcorder videos and have been looking into what is already out on the internet and what kind of equipment people have been using.
What I’ve found is there are some really good videos out there but they usually involve really cool mountain bike trails and often BMX or freestyle riders doing some good bikerobatics (I just made that term up). Anyway, there is nothing wrong with that and they can be very entertaining.
The only thing is that I only found a few videos of trails in the Chicago area and they were on different sites with differing quality and styles. So I still hope to find some time to do some video enhancements of the trail pages on this site soon.

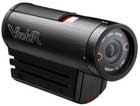
Bike Helmet Cam
In the process I was considering my equipment and what other people out there use. What I found is that a lot of riders use “Helmet Cams”. There are also handlebar camcorder clips and a lot of home made camcorder and camera clips and gadgets out there.
The handlebar camera/camcorder clips that you buy have a typical handlebar attachment on one end and the standard camera tripod screw attachment on the other. I have not tried attaching a camcorder to a handlebar clip but I would think that you would get a lot of vibration in the video that way and the vibration and bumps from the road/trail might be pretty hard on the camcorder.
I don’t currently have a page on the website dedicated to cycling photo and video equipment but I have found the Amazon and REI have good selections of equipment to choose from. You can get some easy links to these websites and other cycling websites on my Bike Accessory page.
So it looks like you can go all the way and get a helmet cam made specifically for the cycling videos (if you plan to do a lot of cycling videos), purchase a handlebar camcoder/camera clip for your bike or even put together something on your own (probably a little risky for the camera and your own saftey).
I’m not sure how I’m going to proceed with this. I do still have a pretty old video of the Sparta Bike Trail that I used to generate the photos on that page (handheld and often as I was riding) so maybe I’ll experiment with that one and see how it comes out.
I am really dying to get out to some new trails and get some new trail photos too but I have found that the photos look better after things get a little greener and the trees have more leaves on them. That should be real soon now!
