2009, 2010 Bikes On Sale

With this being the start of the bike riding season (in most parts of the country), I’ve found that there are a lot of really good deals going on right now on many of name brand and high quality 2009 bikes.

I didn’t want to put together a list of what I consider to be the best individual bike deals (mostly because that is so dependent on the type of bike that you are looking for) but I did put together a page with the Best Buys Online by brand name and with direct links to the on sale categories for some of the most popular online merchants.

Check out “Best Buy” Bikes Online for some good deals on 2009 and 2010 bikes for sale online. There are more selections online but many of the 2009 (or older) models will have a limited selection in stock so this would be a good time to find the best deals.

I hope this helps with your online bike purchases.

Bike Speedometer Batteries

Sorry for the delay in blog posts. I had actually hoped to be doing more rides and updates but the weather has not been that good for riding and I’ve had a few other things going on too.

Anyway, I had some interesting events before my ride today and wanted to pass on some useful (I think) information.

It’s been in the 40s in the Chicago area and even though it was pretty cold it really was a nice day for a ride if you are dressed well for it. Well, I got all prepared and dressed properly, hopped on my bike and found that my speedometer was not working! Damn!

So I worked out a beautiful plan to swing by our Walgreens, which has a connecting bike path to it, on my bike, get the batteries, change them outside and be on my way.

Here’s the useful information that I wanted to pass on. I have a Vetta wireless bike computer and I have already discovered that the speedometer will stop working when the transmitter battery OR the battery in the main bike computer are weak, even though the bike computer battery is still strong enough to  power the main display screen. So if you are not getting a signal, it could be the battery in the transmitter OR the main unit. I am only familiar with my own wireless computer but this could be the case with other manufacturers also.

OK, back to the story… I decided to try the battery in the transmitter first. So I locked my bike and went in to Walgreens and got a battery for the transmitter. Went out to my bike and ended up turning the transmitter cap the wrong way (duh! It says which way for open and close right on it!). Well, I ended up stripping the plastic cap on the transmitter and then was not able to get it off after that (oh well, accidents happen).

So I need to ride back home and work on that so I go to unlock my bike and the lock will not open!!! (so much for my beautiful plan). So I had to call my wife to drive over to Walgreens to pick me up. I asked her to bring my sheet metal cutters to cut the lock cable. Well, that worked just fine. It was so easy to cut that lock cable! (I am going to add another reply to my blog entry on bike locks about that one later).

Fortunately, I had a cadence sensor for this bike computer, that I no longer use and that had the exact same cap that I could use as a replacement for the one that I stripped. I managed to drill the cap off of the speedometer sensor and replaced it with the new cap.

Now, I get to step two. I checked the speedometer, with the new transmitter battery, and it still did not work. It turned out that it was exactly what I explained above. The problem was with the main bike computer battery even though all of the functions (time, odometer, settings, etc.) still worked just fine.

Well, I headed up to Walgreens and got a new battery for the main computer unit, changed it, reset the wheel size, odometer, time, etc., and everything worked just fine!

I finally got my ride in and it was a really nice ride. I did 17 miles and  saw 3 more deer on the Paul Douglas bike path today.

Exercise Bikes, Stationary Bikes and Bike Trainers

I know that I am a little early for this category (there is still plenty of bike riding season left (even here in the Chicago area!)) but I have been wanting to add an Exercise Bike or Stationary Bike section to the site for quite a while now and I have just completed these pages.

The main pages are Exercise Bikes and Bike Trainers.

This was actually quite a bit of work for the number of web pages that I put up because I went out to a number of different places and actually tried out a large number of exercise bikes, in addition to spending some time researching them online.

I also have a friend that is quite an expert in exercise equipment (he has been in the industry for many years) and I have consulted with him and used many of his suggestions.

I will probably be adding more individual exercise bike pages as time goes on, but at least now there is a category for these items on the website.

On a side note, this has held me up as far as the editing of the Des Plaines River Trail video goes. That will be my next project on the bike site, but I can’t say when I will get it posted.

I still want to get out and ride while the weather is still good!

Bike Ride Info: Use Local Weather Radar

Here’s a very helpful bike riding hint/tip that I use all the time now and wanted to pass along: Check your local weather radar if you are concerned about rain before your next ride.

Many of you may already be aware of this or use this service regularly but for you riders out there that haven’t looked into checking your local weather radar before your rides I wanted to pass this on.

Checking your local weather radar before a fairly short ride (up to an hour or two ride) is extremely helpful. For longer rides (like most of the day), you’ll need to depend mostly on the local weather forecast or maybe check the radar for a much wider area.

This helps on a cloudy day or when it looks a little like rain and the forcast predicts some percentage chance of rain but you just don’t know if you will get soaked or not.

Checking the local weather radar is not 100% accurate at picking up a few sprinkles here and there but it is very accurate at locating heavier rain clouds. If you see a large area of green, yellow or red heading towards the area that you are planning your ride you can be pretty sure that you are going to get very wet. You can also judge how fast the rain is moving into your area by animating the radar map and checking the time frame of the updates.

On the other hand, if it is 100% clear on the radar you could still get a few sprinkles but you can be confident that you can take your ride and that you will not get totally soaked or probably not even get wet at all.

On some days, I have checked the radar and seen rain heading toward the area where I was planning to ride and have predicted, with great accuracy, when the rain would start. I could plan how far and how long I would ride  based on this information. I don’t mind a few raindrops on my ride but I really don’t like getting totally soaked to the point that I have to wring out my cloths after my ride!

I live in the Chicagoland are so I prefer the Chicago Tribune Weather Radar. You can also use the Weather Channel Website Radar  for just about any other location or you may have your own local or personal favorites. You’ll probably want to check a few weather radar websites out to see which ones are best for your area.

If you haven’t tried this before, give it a try. It really is quite helpful. Enjoy the ride…

Bike Trail Info from Satellite and Aerial Images

Since we are right in the middle of prime bike riding season, I wanted to pass along some helpful information about checking out bike trails for those of you who may not have already discovered these methods.

Many of us bike trail riders already know some good resources on the internet or are pretty good at finding basic bike trail information (like trail distances, surfaces, trail heads, maps, etc.) through the general search engines.

Once you have found a trail that you would like to ride and ready to go to the next level, I have found that checking out the trail with the satellite and aerial options that are available through sites like Mapquest or Trails.com or with Google Earth can be very helpful (I believe that there may even be more sites with these options now, but these are the ones that I am most familiar with).

There is no shortage of websites that have the basic bike trail information for popular trails (although many of the smaller or out of the way trails are often overlooked) and this website has some good first hand trail information, photos and now even videos of bike trails in the Chicagoland area  (as well as some in Wisconsin and other places) and you will probably want to check out this info for new trails that you are considering or new sections or branches of trails that you may have already been on.

If you are planning a fairly long bike trail ride or really want to check into the surrounding terrian then the satellite images really come in handy. I prefer the sites that add street names when you zoom in to the area that you are interested in.

Printed bike trail maps are great and are a good starting point and it’s nice to keep them with you on a long ride or on a ride in an unfamiliar area. I have found it best to scan a copy of my favorite map and just keep the 8×10 copy with me on my bike because then I don’t have to fold my map to the right area and wear out my map on every ride.

So the printed maps are definately beneficial but there is just way too much information that is not available on the printed maps that can be very obvious with the satellite/aerial images. It takes a little time to research, but once you have zeroed in on the trail that you are planning to ride and have zoomed in to the levels that you like, this option will give you a lot of great information before (or after) exploring new bike trails.

Well, I hope you have found this little update helpful. Enjoy those new trails and your rides!

Bike Trail Video Completed

Well, I finally got my first bike trail video and the format completed and posted on the website. I took the video back in May but I got delayed a few times and since this is the first bike trail video that I have posted, I wanted to put together a format that I could resuse for many more bike trail videos.

I like the format and I composed and performed the music in the background although to be honest I was not really happy with the original video itself. I may retake the video but for now you can find the video here at The Algonquin Road Bike Trail Video!

I tried to keep the overall time low and it ended up at 12 minutes. If you are really interested in this particular trail you may want to watch the whole thing, if not the video controls allow you to skip through sections or you can just check it out and move on if you wish.

I have included video titles throughout the video to explain where you are in the video or other points of interest. It’s easy to add titles with the video editor (I used Adobe Premier) and I think that this keeps the video interesting and helps to provide good information.

Well, I hope you enjoy the new video and I hope I will be able to add many more very soon.

Algonquin Road / Paul Douglas Bike Trail Updates – Photos and Videos

It was a beautiful day yesterday so I got out to the Algonquin Road / Paul Douglas Crabtree bike trail and got photos of the new section (around Paul Douglas Forest Preserve) and got videos of most of the trail.

First of all I just did a quick update on the Algonquin Road trail page on the flooding problems. As of yesterday, there was no flooding. I didn’t see where they did any improvements so I think that it just dried up and could flood again the next time that we get wet conditions.

I also just discovered that they added another 1.2 mile extension to the other end of the trail! At the western end of the bike trail (where it used to end at Penny Road) it now goes through the forest preserve north to Dundee Road and ends at the Crabtree Nature Center (which, unfortunately has a “no bikes” allowed sign).

I have been wanting to get photos of the new section of trail around the Paul Douglas Forest Preserve and managed to get quite a few pictures yesterday. This part of the trail is still brand new (as of last year) so the grass hasn’t even come in completely yet. I also got photos of the new section of the trail from Penny Road to the Crabtree Nature center.

I have not had a chance to review the photos (and video) and format the web pages yet but I hope to get to that fairly soon and update the ART trail page.

As I’ve written in other blog posts, that I have been wanting to get some bike trail videos up on the website to enhance the bike trail photo sections. Since this trail is the closest bike trail to where I live, I started with this one.

I learned a couple of biking photo/video lessons yesterday. First of all, I was trying to do the photos and bike trail video at the same time. This did not work out well at all. It is already a little difficult to do bike trail photos or videos while riding (or stopping periodically) but to try to do both at the same time was just way too much!

I also had a camera and camcorder strapped to me. This does not work out all that well either. I am going to check into either getting still photos from the camcorder or videos from the digital camera or I’ll just make separate trips (when possible) for photos and videos.

At any rate, I did get both photos and a video of the bike trail. I am hoping that I got some good shots but I think that the quality of both the photos and video might not be as good as it could have been if I had just focused on photos or the video seperately.

I should be able to get the photos posted fairly soon but the website bike trail video production is new for me so that will take a little more time. I will be getting to these photo and video updates ASAP though!

I am not a Bike Thief!

But I could have been… OK, here’s the story: I bought a cheap bike for my son to use at college this year and locked it to the bike rack in front of his dorm when we dropped him off last fall. He ended up getting a skateboard and never even used the bike. He also lost the combination to the lock!

The bike was left out all year and we just went to pick him up from school yesterday. We still didn’t have the combination so I brought a hack saw, some sheet metal cutters and other tools with me in case I had a problem with the lock.

I didn’t want to waste a lot of time getting permission to cut the lock so I thought that I would just give it a try and if campus security came by, well, I’d just have to explain and beg for mercy (it’s the “easier to ask for forgiveness than for permission” theory).

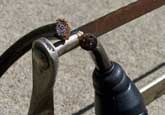
So I put the tools in an inconspicuous, flowery shopping bag and went up to the bike rack (no ski mask to hide my face or anything!) I whipped out my hack saw and got ready for the heist. It took 10 to 15 seconds to saw through the cable lock! It was so easy. I had just done some research for my bike locks page and was reading about how easy it is to cut through cable locks. Well, I just proved it. I’ve read about it but it really sinks in more when you have actually done it and see how easy it is.

Bike lock easily cut with old rusty hack saw

Bike lock easily cut with old rusty hack saw

Even though I was in front of a dorm on a crowded campus in broad daylight. Ten seconds to cut through a bike lock did not drawn any attention. In this case it was our bike anyway but that event highlighted how easy it is to steal a bike if I really were a bike thief.

This lock was pretty thin and cheap but if I can cut through it in 10 seconds then 20 seconds for a thicker cable is still not really a problem.

So, if you have a cable lock, it’s almost useless against someone who really wants the bike.  A high quality U-lock is much better. See the bike locks page for the latest bike security and bike lock updates.

Reaching Bike Riding Nirvana!

For the love of bike riding… Yep, that’s what it’s all about. I’ve been wanting to complete this article on the love of bike riding or Bike Riding Nirvana for quite some time now and have finally completed it today!

You can find the full article Here – “Bike Riding Nirvana”.  I actually really underestimated the effort required for this article. I thought that this would be a creative no brainer since I really didn’t need to do much research for the article but you know it really takes a lot of effort to write a decent, creative and convincing article about something that you really care about.

OK, enough about the creative effort and work behind the article… The “Bike Riding Nirvana” article has a listing many of the important benefits of bike riding and I have also attempted to describe, in my own words, the love and joy of bike riding (it’s not as easy as it sounds).

When I was searching the internet for similar articles, I did find some very informative and creative pages and blog entries but the descriptions were usually just a line or two and were often tutorials on “how to” do something or were slanted in some other way to specifics types or styles of bike riding.

So my goal for this article was to stick with the love, joy and benefits of bike riding only. I think that the article pretty much stays on that topic.

This is the type of thing that I think I may tweak, enhance or add to occasionally but for now I hope you enjoy the Bike Riding Nirvana article.

Bike Trail Flooding

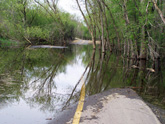
I just rode the Algonquin Road / Paul Douglas Bike Trail yesterday and I was surprised to find that the west side (at the Huntington / Freeman Road and Lakewood intersection) was flooded again (or still)!

Bike Trail Flood

Bike Trail Flood

This is a new trail so I guess they missed this low area in the design and haven’t worked out the kinks yet.

The last time that I did this part of the trail it was even worse and I started to go through but chickened out and turned around when it looked like I was riding into a lake!

This time the water was a little lower and I could see the center line of the trail all the way and I could see where it ended so I went through. I’ve ridden through flooded trails in the past (like along the Des Plaines River Trail) but it can be scary and if the water is too deep you just need to go around it or go back.  I would say if it doesn’t look safe then just don’t do it.

Anyway, the deepest section was probably about 4 inches, which got my shoes wet as I pedaled. On the way back I tried to pedal in short strokes (back and forth and not all the way around) and to keep my feet above the water. Since this was just a short stretch that worked out pretty well.

You can also just go around this little section (it is only about 3/10 of a mile) by going out onto Huntington / Freeman Road which is not very busy at all at this point. You can go out to the road and back to the trail at the trail entrance at Lakewood (south) and at the red fire hydrant (north).

I was considering photographing this part of the trail (which I don’t have on the trail pages yet) but decided that it was too cloudy and not green enough yet (I think I’ll wait a few more weeks). But the nice part about that was that I did have my camera with me (in my bike bag).

Since I had my camera with me, I did take some pictures of the flood and I have posted them on the website. Check out the Bike Trail Flood Photos here.

This is still a really nice bike path so I wouldn’t avoid it just because of the flooding in that one section. But it’s nice to know that it is there ahead of time.